Rabbit breeding requires animal houses. They can be purchased ready-made or custom-made to order. But it is expensive, and the design can be unreliable and not last long. Therefore, the best option would be to build cages for rabbits with your own hands.

Choosing a cell location
If it is necessary to build cages for rabbits, the question arises - where should they be located? It is important to choose a place so that the animals, being in it, do not experience the effects of negative factors, but feel as comfortable as possible. Observe certain requirements when keeping animals in a permanent place:
- Keep rabbits out of drafts. Gusts of wind more than 30 m / s will provoke acute diseases, leading to mortality by livestock. These animals are very sensitive to the through movement of cold air.
- At elevated temperatures and humid air, pathogenic microorganisms actively reproduce, the source of which is feces. Therefore, organize high-quality ventilation, eliminating air stagnation and saturating the room with oxygen.
- Prepare your cells for winter. Do not skimp on bedding, insulate the walls of the rabbitry when outside, or turn on the heating indoors. Keep the temperature of rabbits in the range from +10 to +20 ºС.
Take special care to warm the rabbit housing for pregnant females and rabbits with cubs.
Depending on the climate, the size of the livestock and the availability of free space, rabbit houses can be located outdoors or indoors. Each of the options has certain requirements.
Terrain requirements for the location of cells on the street
Placing cages with rabbits in an open space is possible in regions with a non-sever climate, where winters are rather mild and short, without severe frosts. Otherwise, the animals simply can not stand the effects of the cold and die.
The location of the open-air rabbit cage must meet certain requirements:
- To be dry, which means being away from artificial or natural reservoirs. You can’t place cells in the lowlands and in a place where groundwater is close to the surface of the earth. This condition is necessary due to the fact that rabbits very poorly tolerate air humidity above 75%. Animals become painful, stunted and may eventually die.
- Cells should not be exposed to the scorching sun. It is advisable that trees or shrubs scatter direct sunlight, or you can build a canopy.
Indoor requirements
In severe climatic conditions, a closed type of premises is indispensable. Such shelters must meet several prerequisites:
- To warm the cells with the sun in the daytime and the maximum amount of light arrives, place window openings in the room on the south side. Thus, the duration of the light will be as natural as possible.
- If the length of the day has a short period of time, additional lighting will be required. Also consider the moment of maintaining heat in the winter. An excellent option for providing light and warmth in the room is the use of IR lamps.
- Plaster the inner surface of the walls. The plaster will prevent condensation and help keep the shelter warm in winter.
- The room should provide such an arrangement of cells so that air circulates freely between them, and the front part of the houses is facing east.
- Place the cages indoors on supports with a height of at least 60 cm. This will become an obstacle on the way to the cages of rodents and other pests, provide optimal microclimatic conditions and convenience for humans when taking care of animals.
Necessary materials
You can build a rabbit cage using various building materials. To ensure environmentally friendly conditions, it is recommended to use natural wood. It should be treated with antifungal compounds to improve performance.
The necessary materials used in the construction of a rabbit cage also include:
- wooden beam and boards;
- wooden slats 30-40 mm wide;
- plywood;
- metal mesh with small meshes (otherwise rabbits can get stuck and injure their paws);
- knitting or other metal wire of medium diameter;
- pallets made of plastic appropriate to the size cells.
It is not recommended to use chipboard instead of plywood, because it, when it absorbs moisture, quickly becomes worthless and crumbles, creating conditions for the reproduction of microbes, which affects the well-being of rabbits.
What tools will be needed?
Use tools that are familiar to almost everyone. In order to work harmoniously and calmly, without stopping to search for them, prepare your inventory in advance.
To collect a rabbit cage you may need:
- electric jigsaw (or hacksaw);
- roulette;
- screwdriver and self-tapping screws;
- hammer and small nails;
- construction stapler with brackets;
- side cutters or metal mesh pliers;
- copper or aluminum wire;
- listogib.
Cell dimensions and drawing
The type and size of rabbitry depends primarily on the number of individuals and breed. So, for example, for decorative rabbits there is enough space up to 0.5 square meters. m, and with the maintenance of medium and large breeds as breeding for economic purposes, this space will be small, and the house should have additional premises for certain functions (okrolya, keeping young animals, etc.).
By type of construction, rabbitries can be:
- single-tier or multi-tiered;
- portable or stationary;
- with walking and without such an opportunity;
- sheds, etc.
There are also many author's designs, for example, according to the method of Zolotukhin, Mikhailov, Nikitin, etc.
Rabbit cages have different layouts and sizes depending on sex, age and breed of pets. Females are kept separate from males in order to avoid conflicts due to competition between both sexes and unplanned incidents.
Features of cells for different cases:
- Pregnant rabbits need an individual room in order to be able to spend the period of gestation in peace and to produce healthy offspring. Such cells necessarily have queen cells, where lambing occurs and babies grow up.
- For animals of the same sex and weight and age group, group cages can be provided. Males with an aggressive character need to be jailed in single houses.
To create a diagram or drawing of a cage for rabbits, take a regular notebook sheet in a cage, a sheet of A4 size or graph paper, a ruler and a pencil. Draw the required square, indicating its size and proportions on the paper. Consider the attachment points of the door, feeders and drinking bowls on the drawing. Indicate additional compartments and partitions. List the list of required materials and blanks from them.
Ready-made cell schemes are available in online resources, as well as publications on rabbit breeding. Use one of these options or come up with your own design based on them.
Drawing a single-tier cage for young animals and females with cubs can have any kind and design. It is only important to improve it, if necessary, by adding a mother liquor:

a - cage for keeping young animals: 1 - door; 2 - folding feeder; b - a cage with a permanent nesting compartment for keeping two lactating females: 1 - a feeder; 2 - mesh door; 3 - partition; 4 - manhole; 5 - nest compartment; 6 - mother liquor.
A cage made entirely of metal mesh might look like this:

Multi-tiered rabbit cages save space and make animal care easier:

Parameters of cages for rabbits depending on breed and age
Each cage should house one adult female or male. If this is young, then 5-6 goals are placed in one cage. Repair females are placed in a group of 2-3 individuals, and replacement males after 100 days of age are placed in a single cage.
To make the best use of the space for the rabbitries and to effectively position the rabbits in the houses, consider the size of their housing according to breed and age. Recommended rabbit cell sizes are shown in the table below:
| Age category and breed | The length of the house, cm | Dwelling width, cm | Dwelling height, cm | The area required by 1 animal, sq. m |
| Adult Medium Breed | 100-120 | 70 | 60-80 on the front and 45 on the back wall | 0,6-0,7 |
| Adult large breed | 150 | 70 | 70-80 on the front and 45 on the back wall | 1,05 |
| Young growth (group of 6 individuals) | 100 | 38 | 50 front and 35 rear | — |
Step-by-step instructions for making cells
Making a rabbitry in the presence of a diagram, the necessary materials and tools is not difficult.
Single section cage for an adult
Despite the fact that the size of the houses and their appearance may vary significantly, the construction of the cells includes a single assembly algorithm, which consists of several stages:
- Before starting assembly, all wooden building materials must be treated with a fungicidal compound or antiseptic. This will prevent the rotting of the tree during operation and will not allow the penetration into and reproduction of pathogens. Choose gentle formulations for processing with a minimum content of chlorine and other substances that have a negative effect on rabbits.
- Prepare a 40x40 mm timber. Saw it so that you get pieces of length: 2 pieces of 120 cm, 3 pieces of 62 cm. And connect according to the diagram using wood screws with a press washer:
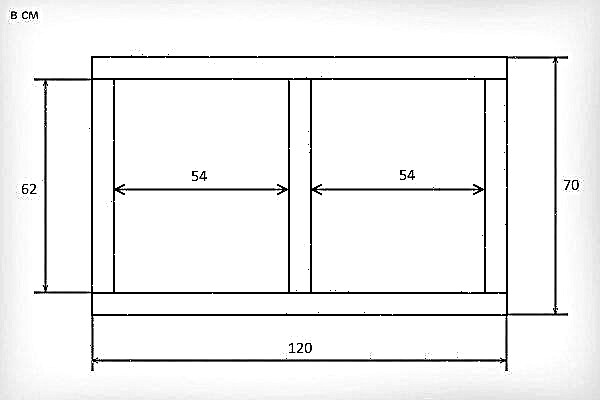 This will be the skeleton of the cell bottom. Next, you should take a grid measuring 120x70 cm with a cell of 12.5x50 mm and a wire diameter of 2 mm, and fix it on the frame with self-tapping screws.
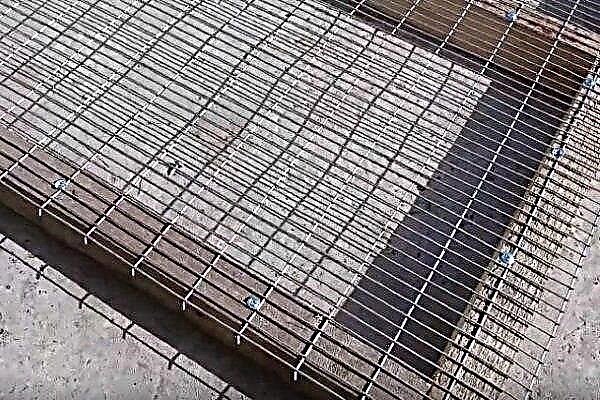
Winter cages need a wooden floor. Assemble it from the rails, securing them with self-tapping screws. Leave small gaps between them. Such a floor covering is environmentally friendly, natural and warm, but over time it will have to be replaced with a new one due to decay.
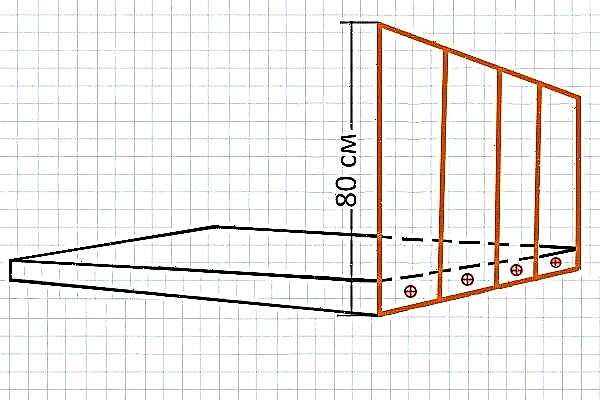
- For sidewalls, you need a trim board 200 mm wide and 40 mm thick. It is necessary to prepare for each wall 4 segments with a length of 80 cm each. Use self-tapping screws to fasten each board to the frame of the bottom of the cage:
- For the back wall, it is necessary to prepare 4 boards with a width of 200 mm, a thickness of 40 mm and a length of 120 cm each. Fasten each board joint to joint along the back wall of the cage using self-tapping screws.
- For the roof, take 4 boards 200 mm wide, 40 mm thick and 150 cm long each. Connect the boards joint to joint, and screw them to the ends of the side walls with screws.
The roof can also be made of a sheet of slate, ondulin or moisture-resistant plywood, sheathed with a piece of linoleum.
- Build the cage facade using a metal mesh (mesh 25x25 mm, wire thickness 1.6 mm) so that the rabbits receive enough light, heat and fresh air. In addition, through a transparent wall, animals will study the surrounding space, and the breeder will be able to follow them without disturbing the peace of the pets.
The door frame is made of 40x20 mm timber. Fasten the grid, as shown in the diagram below. We put the door on the hinges. Do not forget to leave 1 cm gaps so that the door can open and close freely.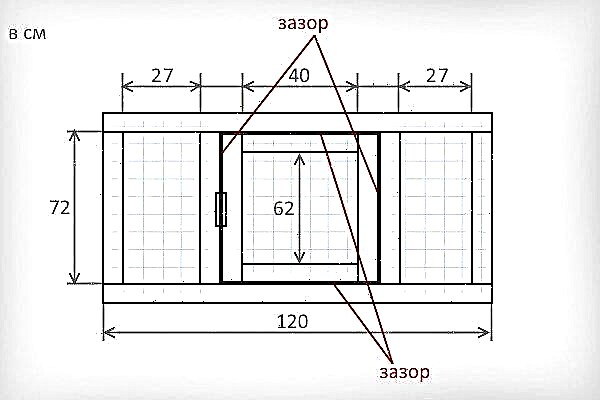 We install the latch on the door.
 - Attach legs from a bar of 50x50 mm to the assembled structure. The cage should be above the ground at a height of 60-80 cm. Please note that it is possible to dig the legs into the ground for stability, so their length can be increased to 100-120 cm.
- The final stage is the installation of feeders and drinkers.
 This will be the skeleton of the cell bottom. Next, you should take a grid measuring 120x70 cm with a cell of 12.5x50 mm and a wire diameter of 2 mm, and fix it on the frame with self-tapping screws.

 We install the latch on the door.
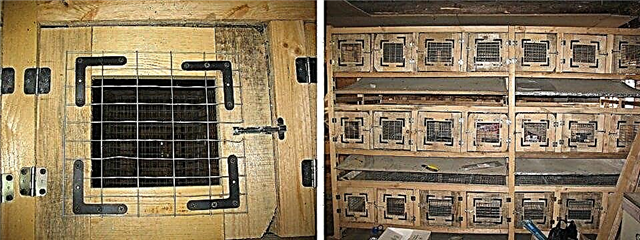
The location of the cells in several floors can significantly save the area of the room.
Cage for males
Males need separate cages so that there are no conflicts and fights between them. When building a rabbitry, keep in mind that the reproduction of rabbits is directly dependent on adequate space in the home. In cramped conditions, males will stop moving enough and become obese. This reduces the quality indicator when mating.
For a rabbit with cubs
In nature, the mating of a female takes place in a burrow, where babies are warm and comfortable. Therefore, before such an event, it is necessary to place the rabbit in a cage with a uterine box. In it, animals feel safe and comfortable.
Newborn rabbits are deprived of fur, so one of the main requirements for the mother liquor is to keep the heat inside and protect the babies from the slightest draft.
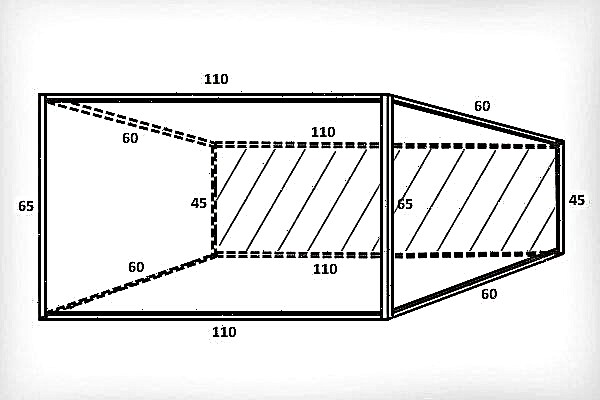
To build such a cell, use the proposed scheme or create your own according to individual requirements:

* dimensions in cm
To assemble a cage with a nesting compartment, you will need a board, plywood, slats, mesh, self-tapping screws, small nails, a hand saw or jigsaw, door hinges. Prepare the parts of the box according to the dimensions of the drawing and proceed with the assembly. The assembly algorithm is as follows:
- Make a frame of the rabbitry from slats according to the diagram below:
 Use blocks in the corners to stiffen the structure.
 - Sheathe the frame with boards so that the slats are inside. Do not touch the front wall yet.
The inside of rabbitry can be sheathed with plywood. The cavity between the board and the plywood can be filled with sawdust to insulate the box, if the conditions of detention require it.
- On the front wall, make a doorway from the slats and a place for a nursery. Board the front wall with boards as shown in the diagram below:
- Cut the partition from a sheet of sanded chipboard according to the dimensions shown in the diagram above.
- Make the door to size, not forgetting about the gaps, so that the door can be easily opened and closed. Install the hinges and place the door.
- Make a day nursery. The top cover should be movable, so attach it to the hinges.
- It is recommended to install the roof on hinges so that, by raising it on hot days, to ventilate the mother liquor. Such a roof will make the process of caring for rabbits convenient.
 Use blocks in the corners to stiffen the structure.

The cage with a nesting box for the female and offspring is ready.
For fattening young animals
Fattening cages are necessary for shedding young rabbits from their mother 40 days after birth. You cannot do without such measures, because babies are already cramped with a female, and there is not enough milk for everyone.
At first, the animals are kept together in the cages for fattening, but when the young growth is 3.5-4 months old, they are separated by sex. Count on one individual at least 0.15 sq. m area.
The sizes of feedlots are presented in the table below:
| Cage length, cm | Cell height, cm | Cell depth, cm | |
| Group maintenance of young animals up to 3.5-4 months | 60 | 30 | 60 |
| Individual dwellings for fattening older young stock | 30 | 30 | 60 |
Such a dwelling is built from a standard set of materials and does not require special knowledge and skills. It is advisable to first draw a drawing in order to prevent mistakes in the cutting of elements and the collection of blanks.
Prepare the following materials and tools for construction:
- wooden boards and timber;
- metal mesh with a fine mesh;
- tin sheet;
- awnings and locking mechanisms;
- a hammer;
- tape measure and pencil;
- pliers and side cutters;
- screwdriver or screwdriver;
- fasteners (screws for wood, nails, etc.);
- saw or jigsaw.
Construction progress of the nursery cage for young rabbits:
- Assemble the main frame from a wooden bar.
- When building a cage, consisting of several tiers, make ramps from tin to remove animal waste products.
- Make a floor from the boards, leaving a distance of 1 cm between them.
- Break the total area into separate cells using rectangular blanks made of metal mesh with a fine mesh, fastening them together with wire or rivets.
- Sew up the side walls of the frame with a tree.
- Assemble the frame of the doors and sew them with a net. Install 2 hinges on each door.
- Place the necessary utensils in the house and feel free to populate rabbits in it.


For outdoor use, make a gable roof using slate or waterproof plywood upholstered with tarpaulin.
Rabbit cages after deposition from mother
Rabbits up to 3 months of age are often kept on the same territory by large companies (15-20 heads each), and the cage differs from the dwelling of adult rabbits only in size and a special feeder. To make such a rabbitry, follow these tips:
- Build the same frame of the house that the cage for adult animals has, providing for each rabbit 0.5 square meters. m of space. It is not necessary to divide the house with the help of partitions delimiting the places for each individual. Divide the entire area of the dwelling into the aft compartment, which occupies 3/5 of the space, and the nest compartment - the remaining space.
- Cover the floor in the nesting area with wood. Place a plywood partition by cutting a hole in it for the entrance.
- Make the front and bottom of the aft compartment of fine mesh. Attach the doors to additional vertical wooden supports located between the main beam using a pair of awnings. Install the locking mechanisms.
- The feeder is installed along the entire feed compartment so that half is located in the cage, and the other protrudes outward. If a metal mesh was used in its manufacture, then raise the feeder to a height of 3-5 cm so that the food does not mix and does not come into contact with waste.
Such a rabbitry can easily accommodate up to 10-12 young rabbits.
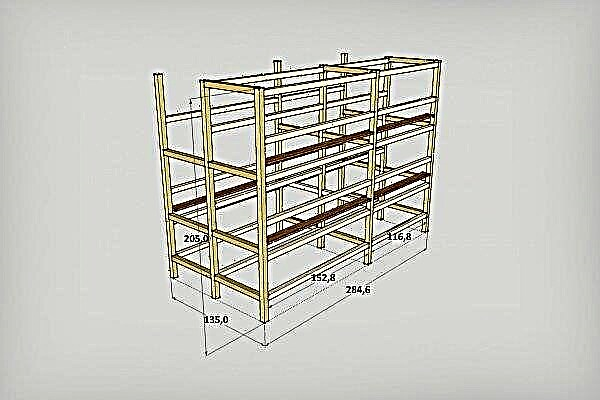
Two-tier (three-tier) sheds
Shed is a rectangular barn in which the cells are arranged in several tiers. A free space of 1-1.5 m is left between the rows of cages, so that the breeder has the opportunity to access each of the cages at the same time. The roof is gable, slate.

Such designs have great success in large rabbit farms with 500 animals. Small breeders build shed systems for keeping 30-50 animals. Building sheds is more cost effective than building a rabbit shed.
When building sheds, consider some features:
- Sheds should be under a roof made of slate or other roofing material.
- The basis for the system is a rectangular wooden or metal frame, which provides a two-sided parallel arrangement of rabbit houses.
- Sheets of metal with a slight slope are located under the cages, which maintains the cleanliness of the cages.
- Contact of the lower tier of cages with the ground surface is not allowed. It is positioned at a height of at least 50 cm to prevent rabbits from freezing in winter.
- The use of sheds is advisable in regions where the winter air temperature does not drop below 35 ° C, and the summer temperature does not rise above 35 ° C.
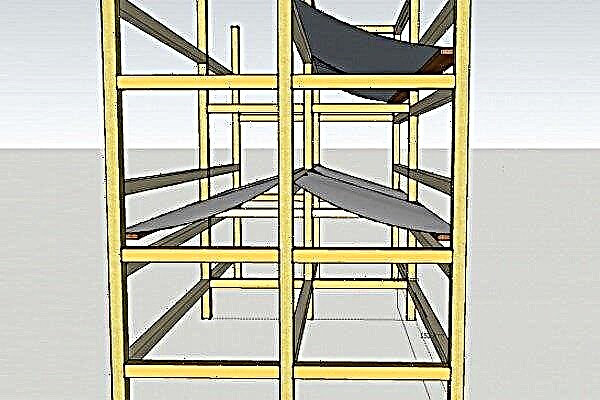
Before building, be sure to familiarize yourself with the various shed schemes and determine the most suitable for you. Transfer your design to paper, customizing it to suit individual preferences and available materials. The most common option is the classic two-tier shed, shown in the figure below:

The construction of such a shed involves the implementation of the work algorithm:
- Build a sturdy structure with metal and wood. The whole system will hold on to it, so be especially careful and check the vertical and horizontal levels more often. Do not skimp on fasteners. Better to redo something now than to end up making it unusable.
- Divide the main frame height by the number of tiers you want. Remember that the gap from floor to ceiling in the cage cannot be less than 40 cm. When installing the tiers, place them not tightly to each other, but leaving a distance between them equal to the dimensions of the pallets intended for waste in the process of life.
- Make the floors of the cages of wood, leaving a distance of 15 mm between the slats.
- Use a metal mesh to upholster the frame. On the front side, install the doors on a wooden base with a mesh inside, fixing them to the door hinges. Provide locking mechanisms.
- Set animal feeding accessories.
- Upon completion of the previous work, the installation of the roof will remain. Use any available roofing material. Make the roof in such a way that precipitation and drafts are not allowed to enter the structure, and most importantly, into rooms with animals.
- Pour the floor inside the shad with concrete, tile it or make it out of wood.
Before the winter period, the sheds must be insulated, and when they are located in cold regions, it is recommended to provide a whole heating system.
Shed designs optimize the work of a breeder in caring for rabbits, and create a particularly favorable living environment for the animals.
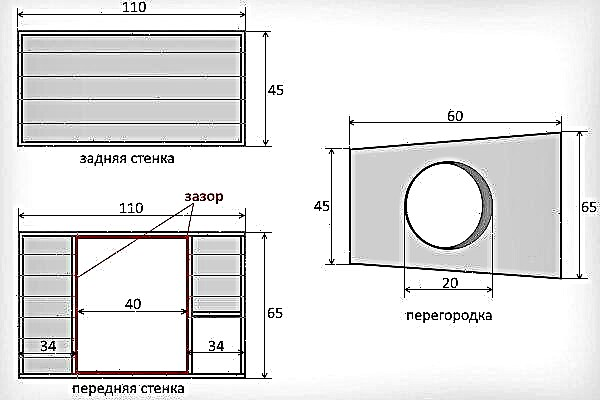
Making a rabbit cage with your own hands according to Mikhailov's method
Igor Mikhailov, a Russian academician, developed an autonomous system for keeping rabbits in the 70s of the last century. The design allows to reduce the labor of the breeder to a minimum, and the conditions of keeping the animals to the maximum.
Rabbits are kept outdoors all year round, breathing fresh air, and a smart cage provides them with proper care. Rabbits raised in this way are distinguished by their endurance, wool quality and accelerated growth.
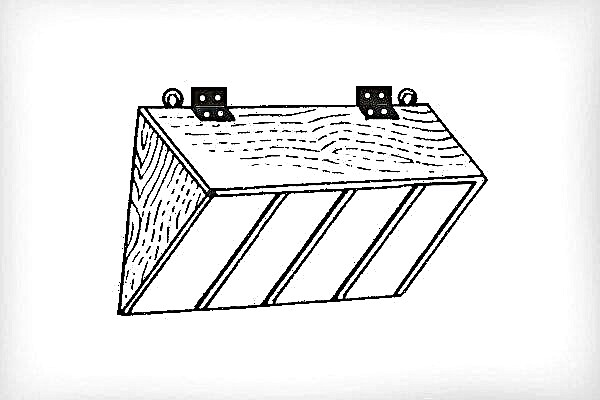
The cell of a simple modification by the method of Academician Mikhailov looks like this:

The rear view of the structure is shown in the figure below:

It is possible to build a multi-tiered house for pets, which will contain up to 20-25 individuals.
The features of rabbitries using this technology include:
- General sealed box for collecting manure.
- The stand-alone design assumes heating of feeders and drinkers during the cold season.
- The cage has one blank wall - the north one.
To keep 2 animals, the cage must be made in the following dimensions:
- total height - 210 cm;
- total width - 240 cm;
- the width of each compartment is 60 cm;
- compartment height - 70 cm;
- the height of the uterine compartment is 40 cm;
- the width of the uterine compartment is 35 cm;
- the angle of the inclined surface in the waste collection box is 45 °.
The construction of the Mikhailovsky rabbit town does not require special building materials. The range is limited to a standard set of timber, plywood, metal mesh and sheet metal.
To build such a cage with your own hands, complete a few step-by-step work:
- Assemble a stand from a wooden bar. It must be as strong and stable as possible to support the weight of the entire structure, along with the rabbits. Ideally, of course, build it on the basis of a metal profile.
Be sure to insulate the stand frame by upholstering it with plywood or other wood. - Assemble the base of the cage, lay the floor in it from slats, with centimeter gaps between them.
- Install drinkers and feeders for animals.
- Sew up the north wall with plywood or osb material. Cover the rest of the sides with a mesh. Hang prepared doors on the facade.
- Place a septum for the uterine compartment by punching an opening into it.
- Make the roof a pitched roof of any material. It is desirable to cover the tree with tarpaulin or linoleum.
- Build a rectangular funnel-shaped tin box to roll waste and feces.
- At the bottom of the box, place a pallet or other container for collecting manure.
It is not necessary to follow the exact dimensions and sequence of the spaces in the cage. Change the location of the mother liquor so that it is convenient for the animals and you.
Making a cage Zolotukhin
Nikolay Zolotukhin has been breeding rabbits for a long time, watching them and striving to improve their conditions to the maximum. As a result of such activities, the rabbit breeder came up with a special type of rabbitries made according to his method.
For an overview of cages for rabbits according to the method of Nikolai Ivanovich Zolotukhin, see the video below:
Zolotukhin's cages provide rabbits with constant fresh air and an optimal amount of light, are easy to build, cost-effective, save space and facilitate animal care.
The design of the rabbitry has its own special nuances:
- The cages are arranged in three tiers in such a way that each floor is shifted back by 10-20 cm. This distance is covered with a net, through which the waste of the rabbit's vital activity rushes into the sump without getting into the lower cages.
- According to the breeder, animals are extremely uncomfortable if the floor in the cages is covered with a net or slats with slits. Therefore, its cages assume a solid wood or slate flooring. The mesh is installed only along the back wall to remove faeces.
- The design does not imply the constant presence of the uterine box inside the cell. In the warm season, a separated space covered with straw becomes the mother liquor, and for the winter it is possible to temporarily install the nesting box.
- The feeder is attached to the door frame so that half of it is located inside the cage, and the other part protrudes outward. This makes it easier to clean and refill the feed.
Nikolai Ivanovich does not give the exact dimensions of the cage, claiming that each rabbit breeder will decide for himself what area he can take for the structure. Therefore, below we present the average parameters of the cage for medium and large breeds of rabbits in the form of a table.
| Width, cm | Height, cm | Depth cm | Mesh width, cm | Floor slope, cm | Doors, cm |
| 200 | 150 | 80 | 15-20 | from 5 to 7 | 40×40 |
Installation of Zolotukhin's rabbitry should not cause difficulties and problems during work, which will require a standard simple set of building materials and tools.
For construction, follow the following sequence of actions:
- Assemble a frame base measuring 200 by 80 cm from the beams. Install the bases of each tier.
- Cover the floor of the floors, remembering that the 20 cm wide strip at the back wall is sewn up with a net. To form a slope in the front of the cage, fix a wooden block 5 cm high.
- Install slats at each middle of the floor, between which maintain a distance of 25-30 cm. There will be feeders for grass and hay.
- It is preferable to sew the back walls with polycarbonate so that moisture from manure does not spoil the material. Fix it in such a way that a slope is formed: the upper part of the wall of the first tier begins where the lattice of the upper tier ends.
- Assemble a door of a common structure for all floors, attach feeders to it. Make the doors for the mother compartment of plywood so that no light enters the mother compartment, irritating the rabbits.
- Sheathe the sides of the cage with thick plywood or other wood material.
- Protect the wooden corners inside the cage with metal corners to prevent damage from animals.
- Carry out the roofing work using slate, laying it so that the edges protrude at least 5 cm from the walls of the cage. This measure will prevent precipitation water from entering the cage.
- Prepare the uterine box according to the general scheme so that when the cold weather sets in, you can use it.
- Make feeders and a sennik and set them up. Cover the feeder blanks with sheet metal to prevent rabbits from chewing on the wooden device.
The cage is ready. Its placement is possible both in open space and indoors.
Do you need a cage with a walk?
A walkable house is not required, but if it is possible to place it on an area with lush lush grass, then the rabbits will be incredibly happy about it.

The walking room can be built separately or attached to a ready-made rabbitry. Most often, the construction of such a corral is carried out from a metal mesh in the form of a square structure. Running inside it, pets do not allow the body's muscular system to weaken, strengthen their immunity and prevent their own obesity.
Each breeder decides whether to build a walk or not.
Arrangement of the cell
Mandatory attributes in the rabbitry are feeders and drinkers. They can be purchased in stores or made by hand. Consider the following tips when setting up your cage:
- Do not use plates or other flat containers as feeding accessories. Rabbits will turn them over, contaminating the contents of the cage itself.
- A container made of fragile thin plastic will quickly fail due to gnawing by animals. In addition, pets can injure themselves with sharp edges when breaking off the shards or swallow them.
- Metal containers are stronger than those made of plastic, but the water quickly becomes cloudy.
- It is recommended to suspend the drinking bowls and build them of an automatic type. Ready-made, of various designs and modifications (choke, nipple, vacuum, etc.) are on sale.
- Make hay feeders out of mesh.
- Provide feeders for bulk mixes and vegetables.
- Keep your feeding accessories clean.
Building a cage for rabbits with your own hands is a simple and exciting exercise. The end result will bring satisfaction to the breeder, and will be the key to comfortable breeding. Healthy offspring, well-fed rabbits with excellent quality fur and meat - all this is possible if you have a house assembled by your own hands and favorable conditions for maintenance and care.